

第04章 IDEA的安装与使用(下)(Java教程)
第04章_IDEA的安装与使用(下)
讲师:尚硅谷-宋红康(江湖人称:康师傅)
8. 快捷键的使用
8.1 常用快捷键
见《尚硅谷_宋红康_IntelliJ IDEA 常用快捷键一览表.md》
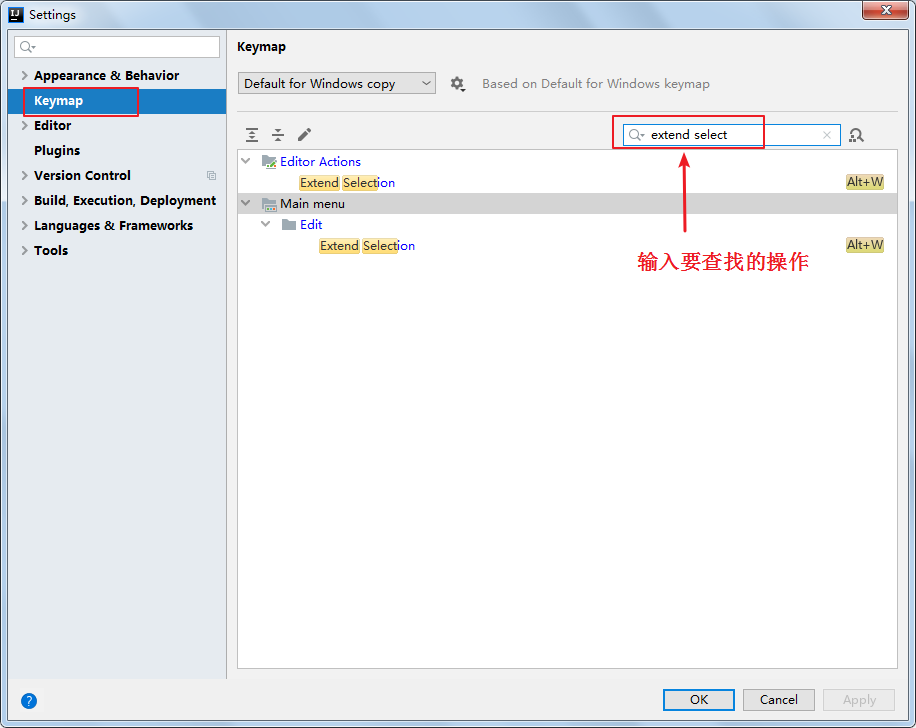
8.2 查看快捷键
1、已知快捷键操作名,未知快捷键
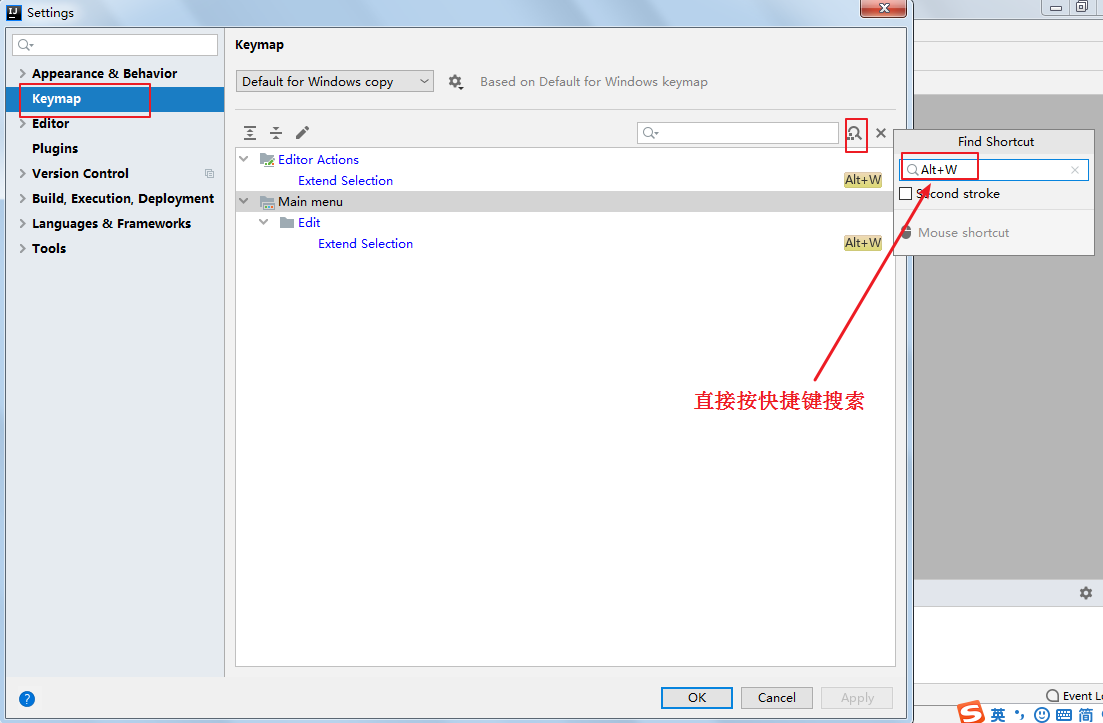
2、已知快捷键,不知道对应的操作名
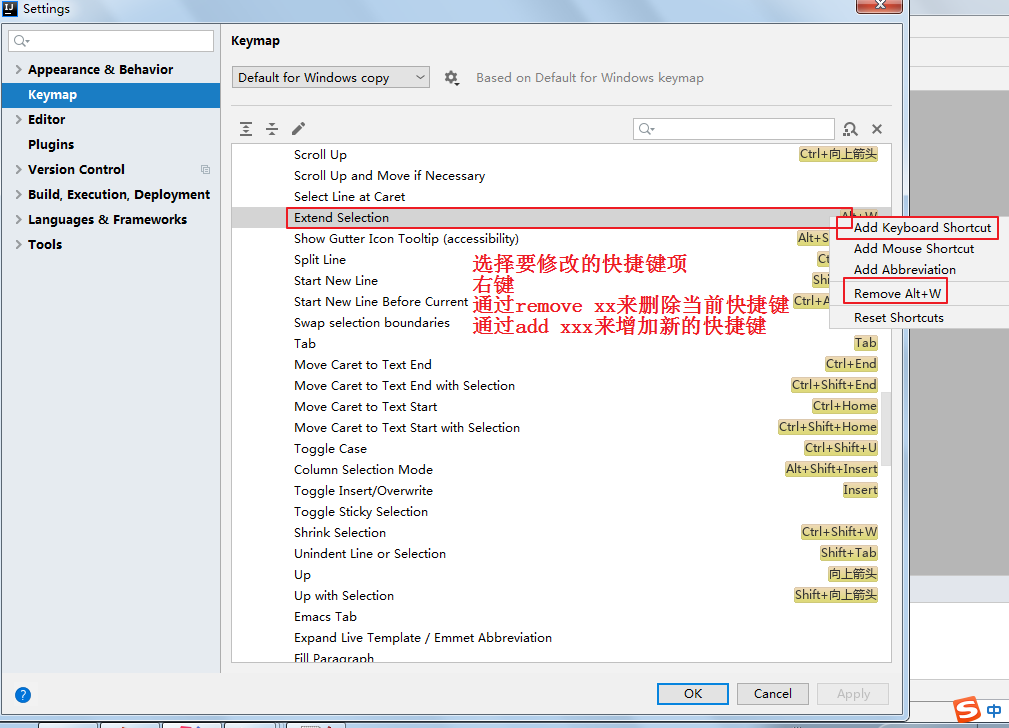
8.3 自定义快捷键
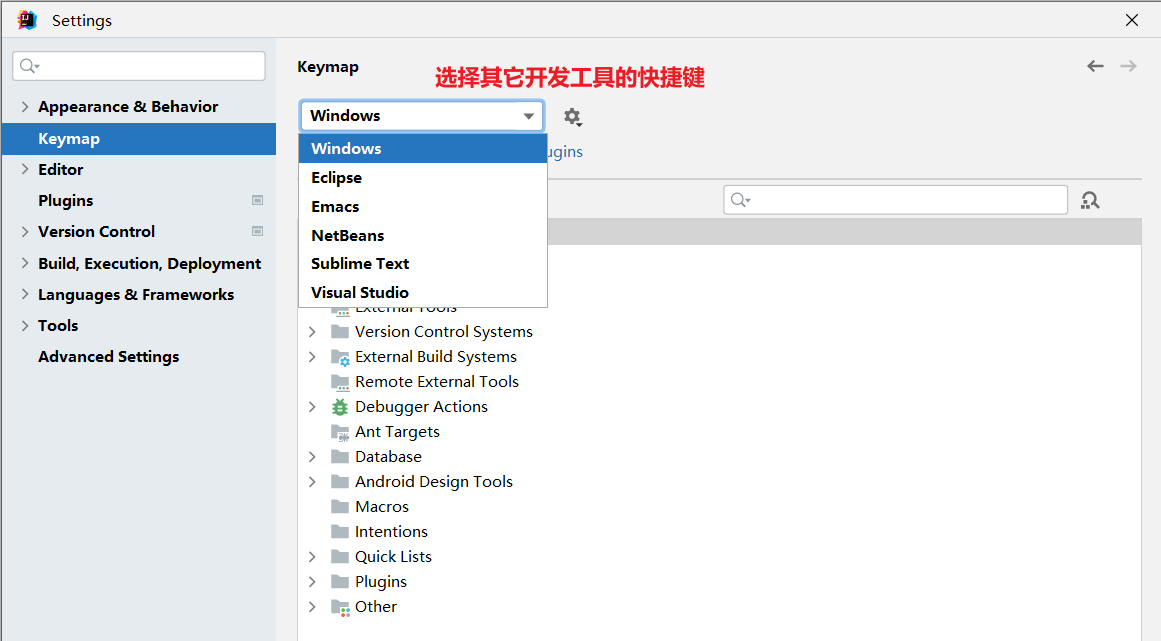
8.4 使用其它平台快捷键
苹果电脑或者是用惯Eclipse快捷的,可以选择其他快捷键插件。
9. IDEA断点调试(Debug)
9.1 为什么需要Debug
编好的程序在执行过程中如果出现错误,该如何查找或定位错误呢?简单的代码直接就可以看出来,但如果代码比较复杂,就需要借助程序调试工具(Debug)来查找错误了。
运行编写好的程序时,可能出现的几种情况:
> 情况1:没有任何bug,程序执行正确!

====================如果出现如下的三种情况,都又必要使用debug=============================
> 情况2:运行以后,出现了错误或异常信息。但是通过日志文件或控制台,显示了异常信息的位置。
> 情况3:运行以后,得到了结果,但是结果不是我们想要的。
> 情况4:运行以后,得到了结果,结果大概率是我们想要的。但是多次运行的话,可能会出现不是我们想要的情况。
        比如:多线程情况下,处理线程安全问题。
9.2 Debug的步骤
Debug(调试)程序步骤如下:
1、添加断点
2、启动调试
3、单步执行
4、观察变量和执行流程,找到并解决问题
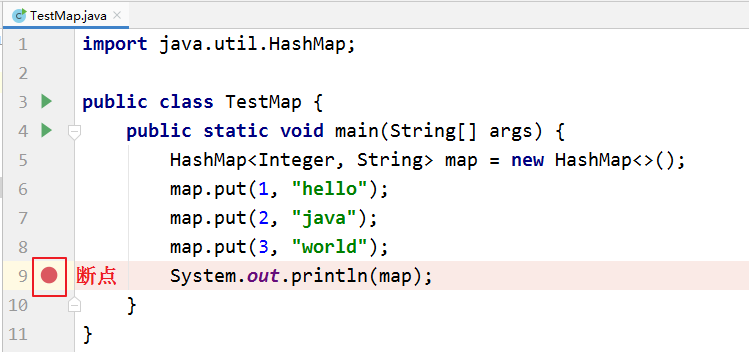
1、添加断点
在源代码文件中,在想要设置断点的代码行的前面的标记行处,单击鼠标左键就可以设置断点,在相同位置再次单击即可取消断点。
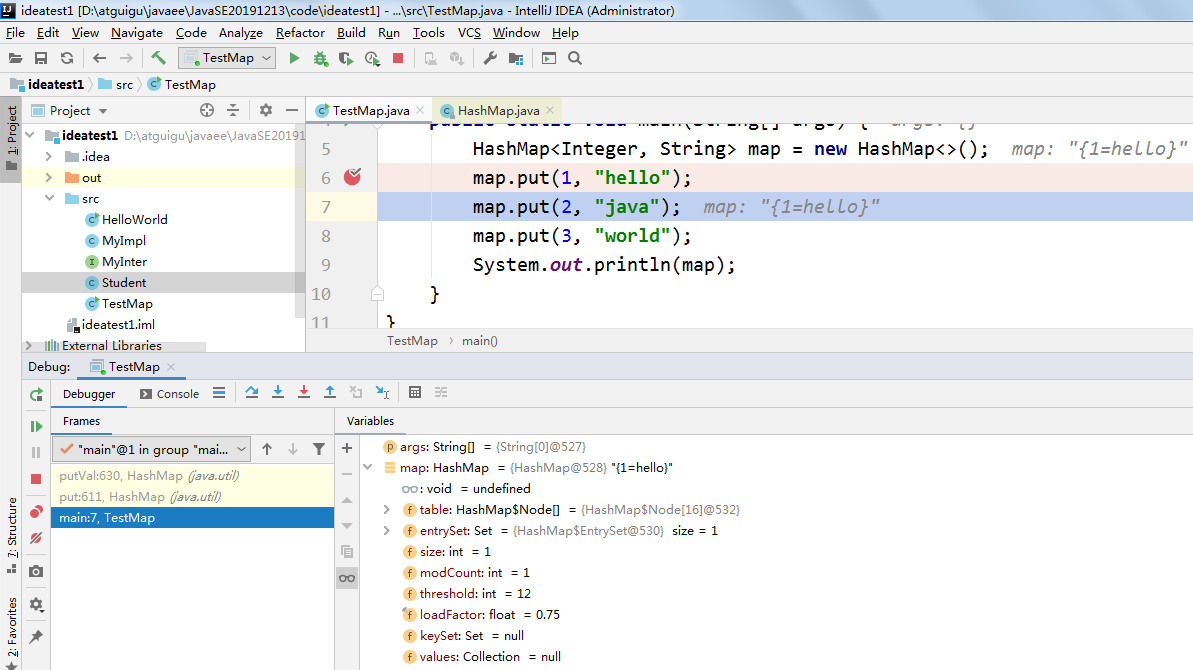
2、启动调试
IDEA提供多种方式来启动程序(Launch)的调试,分别是通过菜单(Run –> Debug)、图标(“绿色臭虫” 等等
等等
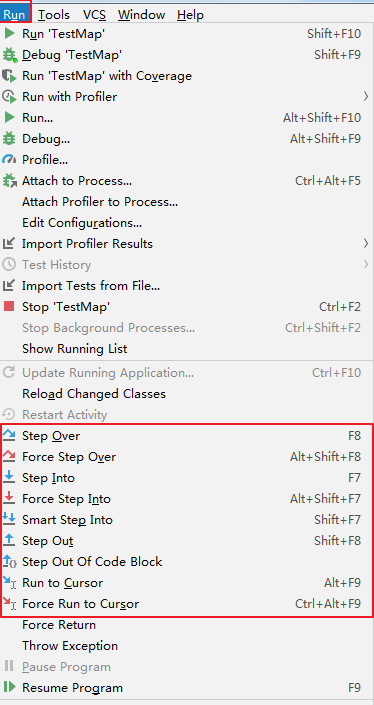
3、单步调试工具介绍
或
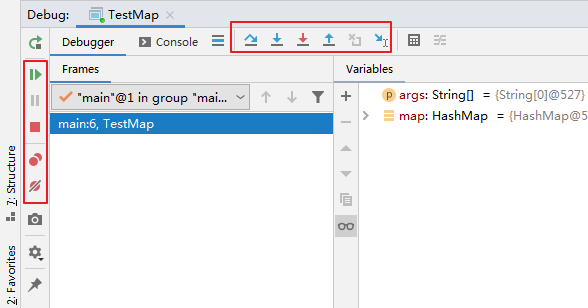
 :Step Over(F8):进入下一步,如果当前行断点是调用一个方法,则不进入当前方法体内
 :Step Into(F7):进入下一步,如果当前行断点是调用一个自定义方法,则进入该方法体内
 :Force Step Into(Alt +Shift + F7):进入下一步,如果当前行断点是调用一个核心类库方法,则进入该方法体内
 :Step Out(Shift + F8):跳出当前方法体
 :Run to Cursor(Alt + F9):直接跳到光标处继续调试
 :Resume Program(F9):恢复程序运行,但如果该断点下面代码还有断点则停在下一个断点上
 :Stop(Ctrl + F2):结束调试
 :View Breakpoints(Ctrl + Shift + F8):查看所有断点
 :Mute Breakpoints:使得当前代码后面所有的断点失效, 一下执行到底
说明:在Debug过程中,可以动态的下断点。
9.3 多种Debug情况介绍
9.3.1 行断点
- 断点打在代码所在的行上。执行到此行时,会停下来。
package com.atguigu.debug;

/**
 * ClassName: Debug01
 * Package: com.atguigu.debug
 * Description: 演示1:行断点  &  测试debug各个常见操作按钮
 *
 * @Author: 尚硅谷-宋红康
 * @Create: 2022/10/20 18:44
 * @Version 1.0
 */
public class Debug01 {
    public static void main(String[] args) {
        //1.
        int m = 10;
        int n = 20;
        System.out.println("m = " + m + ",n = " + n);
        swap(m, n);
        System.out.println("m = " + m + ",n = " + n);

        //2.
        int[] arr = new int[] {1,2,3,4,5};
        System.out.println(arr);//地址值

        char[] arr1 = new char[] {'a','b','c'};
        System.out.println(arr1);//abc
    }

    public static void swap(int m,int n){
        int temp = m;
        m = n;
        n = temp;
    }

}
9.3.2 方法断点
- 断点设置在方法的签名上,默认当进入时,断点可以被唤醒。
- 也可以设置在方法退出时,断点也被唤醒
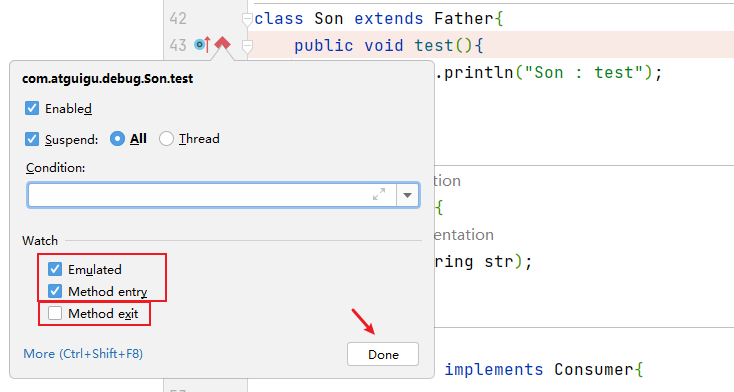
- 在多态的场景下,在父类或接口的方法上打断点,会自动调入到子类或实现类的方法
package com.atguigu.debug;

import java.util.HashMap;

/**
 * ClassName: Debug02
 * Package: com.atguigu.debug
 * Description: 演示2: 方法断点
 *
 * @Author: 尚硅谷-宋红康
 * @Create: 2022/10/20 21:15
 * @Version 1.0
 */
public class Debug02 {
    public static void main(String[] args) {

        //1.
        Son instance = new Son();
        instance.test();
        //2.
        Father instance1 = new Son();
        instance1.test();

        //3.
        Consumer con = new ConsumerImpl();
        con.accept("atguigu");

        //4.
        HashMap map = new HashMap();
        map.put("Tom",12);
        map.put("Jerry",11);
        map.put("Tony",20);
    }
}

class Father{
    public void test(){
        System.out.println("Father : test");
    }
}

class Son extends Father{
    public void test(){
        System.out.println("Son : test");
    }
}

interface Consumer{
    void accept(String str);
}

class ConsumerImpl implements Consumer{

    @Override
    public void accept(String str) {
        System.out.println("ConsumerImple:" + str);
    }
}
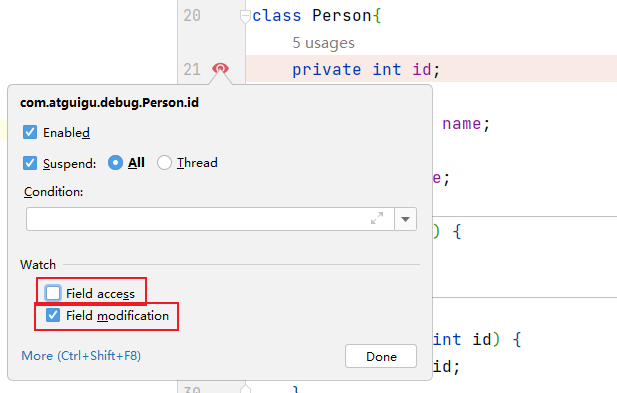
9.3.3 字段断点
- 在类的属性声明上打断点,默认对属性的修改操作进行监控
package com.atguigu.debug;

/**
 * ClassName: Debug03
 * Package: com.atguigu.debug
 * Description: 演示3:字段断点
 *
 * @Author: 尚硅谷-宋红康
 * @Create: 2022/10/20 21:34
 * @Version 1.0
 */
public class Debug03 {
    public static void main(String[] args) {
        Person p1 = new Person(3);

        System.out.println(p1);
    }
}

class Person{
    private int id = 1;
    private String name;
    private int age;

    public Person() {
    }
    {
        id = 2;
    }
    public Person(int id) {
        this.id = id;
    }


    public Person(int id, String name, int age) {
        this.id = id;
        this.name = name;
        this.age = age;
    }

    public int getId() {
        return id;
    }

    public void setId(int id) {
        this.id = id;
    }

    public String getName() {
        return name;
    }

    public void setName(String name) {
        this.name = name;
    }

    public int getAge() {
        return age;
    }

    public void setAge(int age) {
        this.age = age;
    }

    @Override
    public String toString() {
        return "Person{" +
                "id=" + id +
                ", name='" + name + '\'' +
                ", age=" + age +
                '}';
    }
}
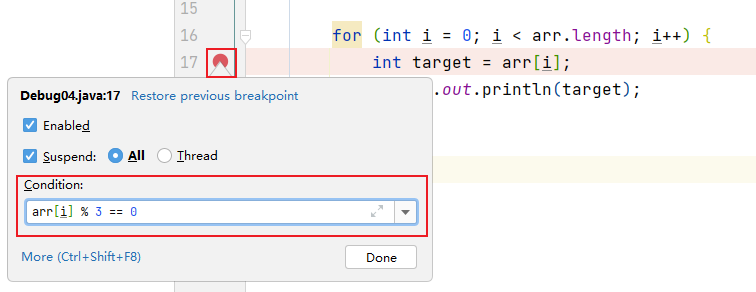
9.3.4 条件断点
package com.atguigu.debug;

/**
 * ClassName: Debug04
 * Package: com.atguigu.debug
 * Description: 演示4:条件断点
 *
 * @Author: 尚硅谷-宋红康
 * @Create: 2022/10/20 21:49
 * @Version 1.0
 */
public class Debug04 {
    public static void main(String[] args) {
        int[] arr = new int[]{1,2,3,4,5,6,7,8,9,10,11,12};

        for (int i = 0; i < arr.length; i++) {
            int target = arr[i];
            System.out.println(target);
        }
    }
}
针对上述代码,在满足arr[i] % 3 == 0的条件下,执行断点。
9.3.5 异常断点(暂略)
- 对异常进行跟踪。如果程序出现指定异常,程序就会执行断点,自动停住。
package com.atguigu.debug;

import java.util.Date;

/**
 * ClassName: Debug05
 * Package: com.atguigu.debug
 * Description: 演示5:异常断点
 *
 * @Author: 尚硅谷-宋红康
 * @Create: 2022/10/20 22:01
 * @Version 1.0
 */
public class Debug05 {
    public static void main(String[] args) {

        int m = 10;
        int n = 0;
        int result = m / n;
        System.out.println(result);


//        Person p1 = new Person(1001);
//        System.out.println(p1.getName().toUpperCase());


    }
}
通过下图的方式,对指定的异常进行监控:

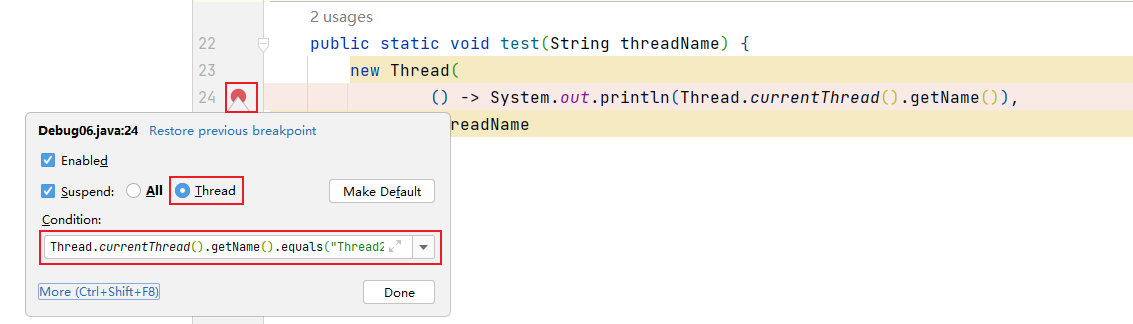
9.3.6 线程调试(暂略)
package com.atguigu.debug;

/**
 * ClassName: Debug06
 * Package: com.atguigu.debug
 * Description: 演示6:线程调试
 *
 * @Author: 尚硅谷-宋红康
 * @Create: 2022/10/20 22:46
 * @Version 1.0
 */
public class Debug06 {

    public static void main(String[] args) {

        test("Thread1");
        test("Thread2");


    }

    public static void test(String threadName) {
        new Thread(
                () -> System.out.println(Thread.currentThread().getName()),
                threadName
        ).start();
    }

}
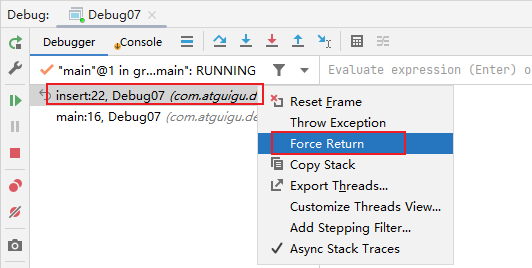
9.3.7 强制结束
package com.atguigu.debug;

/**
 * ClassName: Debug07
 * Package: com.atguigu.debug
 * Description: 演示7:强制结束
 *
 * @Author: 尚硅谷-宋红康
 * @Create: 2022/10/20 23:15
 * @Version 1.0
 */
public class Debug07 {
    public static void main(String[] args) {
        System.out.println("获取请求的数据");
        System.out.println("调用写入数据库的方法");
        insert();
        System.out.println("程序结束");
    }

    private static void insert() {
        System.out.println("进入insert()方法");
        System.out.println("获取数据库连接");
        System.out.println("将数据写入数据表中");
        System.out.println("写出操作完成");
        System.out.println("断开连接");
    }
}
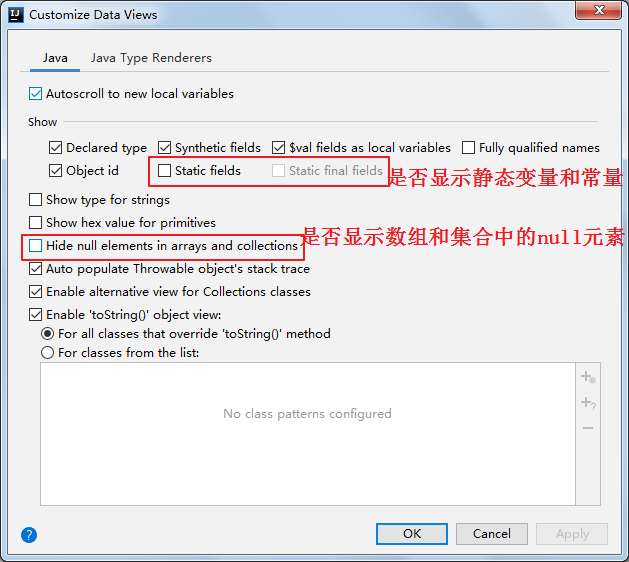
9.4 自定义调试数据视图(暂略)
package com.atguigu.debug;

import java.util.HashMap;

/**
 * ClassName: Debug08
 * Package: com.atguigu.debug
 * Description: 演示8:用户自定义数据视图
 *
 * @Author: 尚硅谷-宋红康
 * @Create: 2022/10/20 23:21
 * @Version 1.0
 */
public class Debug08 {
    public static void main(String[] args) {
        HashMap<Integer,String> map = new HashMap<>();
        map.put(1,"高铁");
        map.put(2,"网购");
        map.put(3,"支付宝");
        map.put(4,"共享单车");

        System.out.println(map);
    }
}
设置如下:

9.5 常见问题
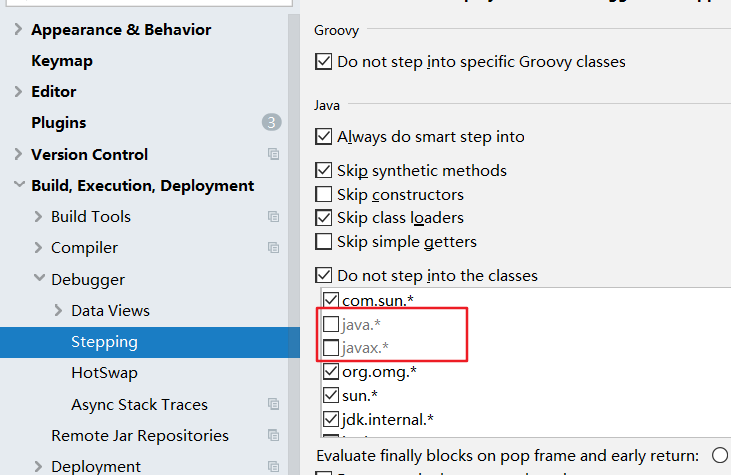
问题:使用Step Into时,会出现无法进入源码的情况。如何解决?
方案1:使用 force step into 即可
方案2:点击Setting -> Build,Execution,Deployment -> Debugger -> Stepping
把Do not step into the classess中的java.*、javax.* 取消勾选即可。
小结:
经验:初学者对于在哪里加断点,缺乏经验,这也是调试程序最麻烦的地方,需要一定的经验。
简单来说,在可能发生错误的代码的前面加断点。如果不会判断,就在程序执行的起点处加断点。
10. IDEA常用插件
推荐1:Alibaba Java Coding Guidelines

阿里巴巴Java编码规范检查插件,检测代码是否存在问题,以及是否符合规范。
使用:在类中,右键,选择编码规约扫描,在下方显示扫描规约和提示。根据提示规范代码,提高代码质量。
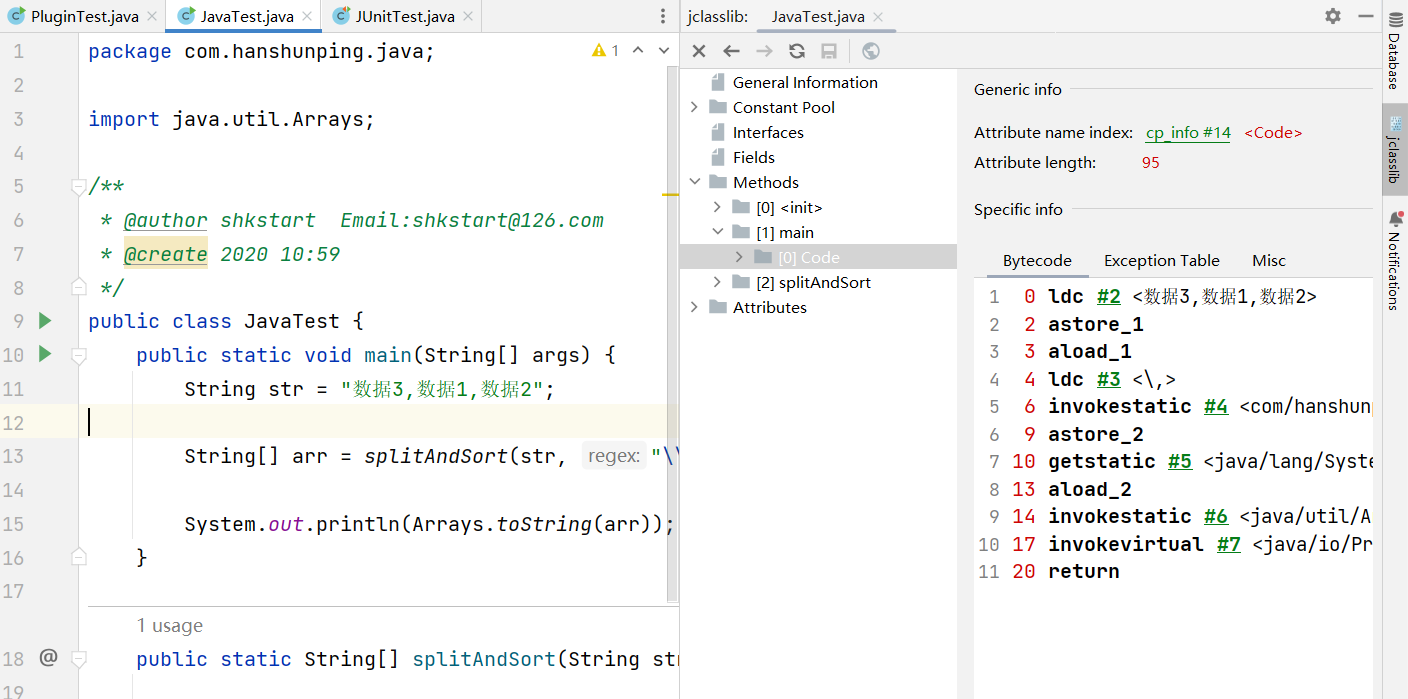
推荐2:jclasslib bytecode viewer

可视化的字节码查看器。
使用:
- 在 IDEA 打开想研究的类。
- 编译该类或者直接编译整个项目( 如果想研究的类在 jar 包中,此步可略过)。
- 打开“view” 菜单,选择“Show Bytecode With jclasslib” 选项。
- 选择上述菜单项后 IDEA 中会弹出 jclasslib 工具窗口。
英文设置:
在 Help -> Edit Custom VM Options …,加上
-Duser.language=en
推荐3:Translation

注册翻译服务(有道智云、百度翻译开放平台、阿里云机器翻译)帐号,开通翻译服务并获取其应用ID和密钥
绑定应用ID和密钥:偏好设置(设置) > 工具 > 翻译 > 常规 > 翻译引擎 > 配置…
使用:鼠标选中文本,点击右键即可自动翻译成多国语言。
注:请注意保管好你的应用密钥,防止其泄露。
推荐4:GenerateAllSetter

实际开发中还有一个非常常见的场景: 我们创建一个对象后,想依次调用 Setter 函数对属性赋值,如果属性较多很容易遗漏或者重复。
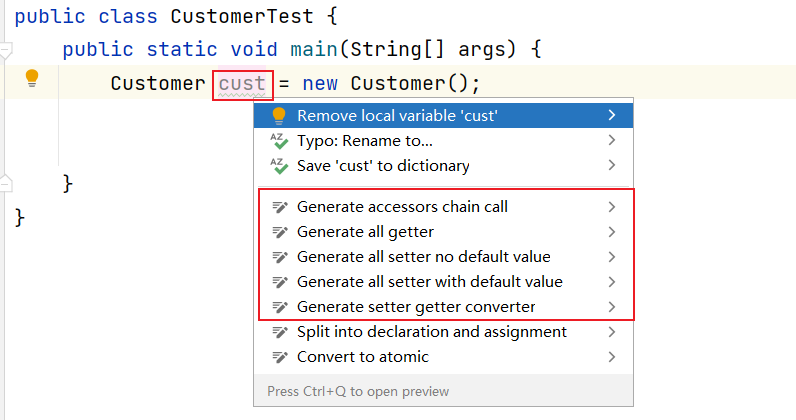
可以使用这 GenerateAllSetter 提供的功能,快速生成对象的所有 Setter 函数(可填充默认值),然后自己再跟进实际需求设置属性值。
插件5:Rainbow Brackets

给括号添加彩虹色,使开发者通过颜色区分括号嵌套层级,便于阅读

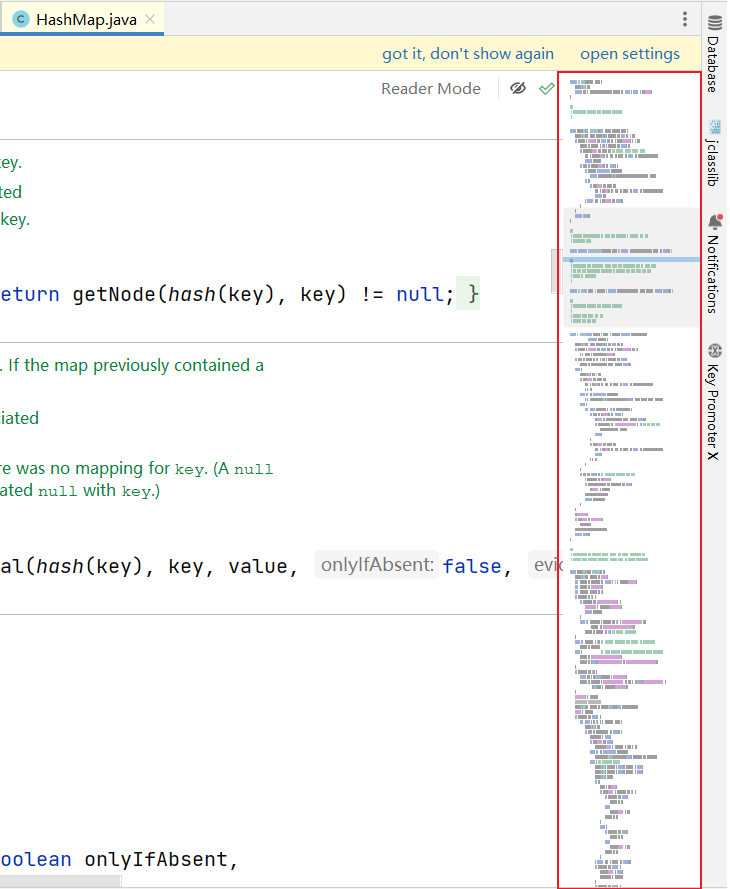
推荐6:CodeGlance Pro

在编辑器右侧生成代码小地图,可以拖拽小地图光标快速定位代码,阅读行数很多的代码文件时非常实用。
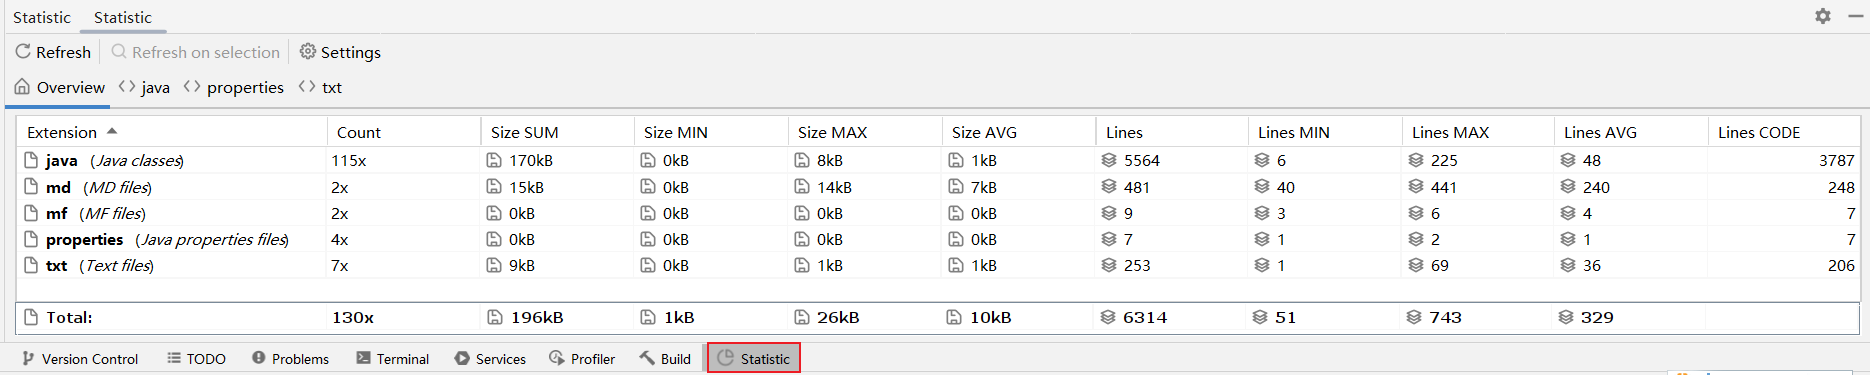
推荐7:Statistic

代码统计工具。

推荐8:Presentation Assistant

显示快捷键操作的按键
推荐9:Key Promoter X

快捷键提示插件。当你执行鼠标操作时,如果该操作可被快捷键代替,会给出提示,帮助你自然形成使用快捷键的习惯,告别死记硬背。
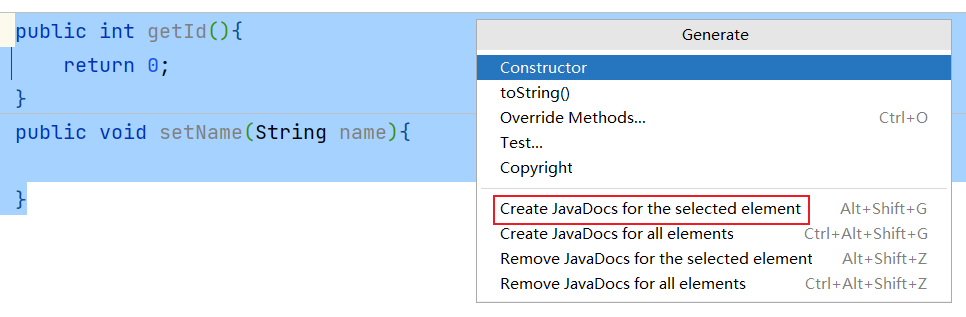
推荐10:JavaDoc

按alt+insert,执行操作:
推荐11: LeetCode Editor


在 IDEA 里刷力扣算法题
推荐12:GsonFormatPlus

根据 json 生成对象。
使用:使用alt + s 或 alt + insert调取。
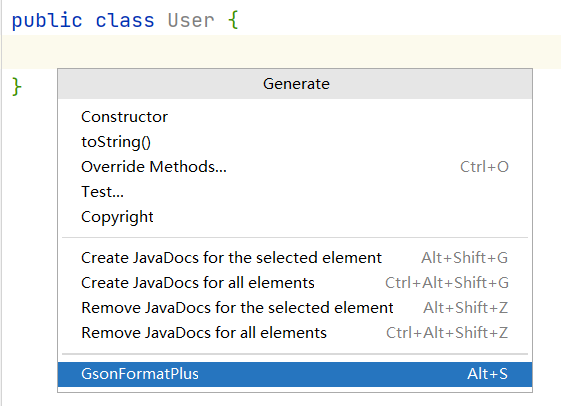
举例:
{
    "name": "tom",
    "age": "18",
    "gender": "man",
    "hometown": {
        "province": "河北省",
        "city": "石家庄市",
        "county": "正定县"
    }
}
插件13:Material Theme UI

对于很多人而言,写代码时略显枯燥的,如果能够安装自己喜欢的主题将为开发工作带来些许乐趣。
IDEA 支持各种主题插件,其中最出名的当属 Material Theme UI。
安装后,可以从该插件内置的各种风格个选择自己最喜欢的一种。